
[Guest post by Samuel Dawson from Designs2HTML]
With the internet becoming one of the most sought-after platforms for performing multiple purchases, it has become imperative for the e-commerce merchants to have an e-store that’s capable of wooing the customers instantly. Despite its popularity as a CMS(Content Management System), WordPress has been considered as one of the most specialized eCommerce platforms that help in building high-end e-commerce websites for a targeted group of audience.
In today’s post, I’ll walk you through an easy guideline on building a powerful and robust e-commerce website using a popular and highly recommended WordPress plugin called WooCommerce.
What makes WooCommerce one of the most preferred plugins for building a WordPress powered e-commerce website?
Well, it is the perfect compliance with the WordPress core and high-end e-Commerce features that make WooCommerce one of the foremost choices of online merchants who’re interested in building a beautiful and feature-loaded e-commerce website. Available for free, WooCommerce plugin will effectively add cart to your website and help you in managing the content in a hassle-free way.
And now, let’s head on to the steps associated with creating a WordPress enriched e-commerce website
Step 1- Install WordPress on your host’s server
As the very first step, you need to buy a suitable hosting plan, followed by a quick installation of WordPress on your host’s server. However, you may also opt for installing WordPress locally so as to test your website.
Step 2- Install the WooCommerce plugin
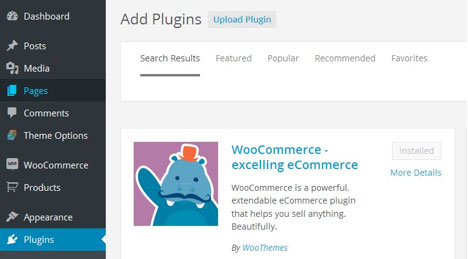
Once you’re done with installing WordPress, it’s time to log on to your admin dashboard and go to “Plugins†available within the menu displayed towards the left hand side. Next, click on “Add New†and you’ll be able to view the WordPress plugin repository. From here, search for the “WooCommere†plugin and click on the “Install†button. Have a look at the screen-shot below:
Step 3- Configure the WooCommerce plugin
Now, click on ‘WooCommerce’ and go ahead with configuring different settings for your WooCommerce plugin. Here’s a screen-shot and explanation for the same:

- General tab– Here, you’ll be defining your business location in addition to the countries you intend to sell your products to. Also, you’ll be able to specify the currency-related details like currency position, decimal separator, thousand separator and the count of decimals. After having filled in the desired details, just hit on ‘Save changes’ button.
- Products tab– You can use this section for tweaking the product settings and the way products are displayed i.e inventory, product image sizes and downloadable products.
- Tax tab– Here, you can find options that would allow you to configure the tax applicable on different products available on your e-store.
- Checkout tab- You can use this section for tweaking the settings for your e-store’s Checkout pages as well the payment gateway and coupon usage settings.
- Shipping tab– This tab comprises of options that allow you to define custom shipping methods that would include restricted shipping for certain countries.
- Accounts tab– You can use this section for enabling the user registration on a specific webpage within the website. Moreover, you can also use it for generating a username from a specific customer’s email address in case of account creation.
- Emails tab– Here, you’ll find options for enabling/disabling the email notifications that are being sent to the customers as and when they perform specific actions like ordering for products, canceling product orders, resetting passwords or creating a brand new customer account. Additionally, you can also find options for designing a unique email template and describing the content that needs to be inserted into the email.
Step 4- Start adding products to your WordPress e-store
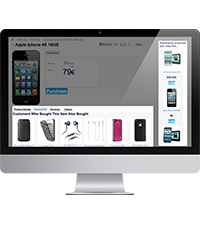
Just like addition of a new post into WordPress blog/site, you can easily add different products into your WordPress powered e-store. Just go to your admin dashboard and within the left menu, click on ‘Products’ option available under the ‘WooCommerce’ option. A screen similar to the one shown below would appear on your monitor:

Step 5- Install a WooCommerce compatible theme
Once you’re done with installing the WooCOmmerce plugin, it’s time to go ahead with the installation of a WooCommerce compatible theme. For example, Mystile is a lightweight WooCommerce theme that allows you to showcase your e-store products in a fantastic way. Packed with tons of alternate color schemes, shortcodes, a custom homepage and WooCommerce goodness, Mystile theme makes your website adapt to a wide variety of mobile devices and hard-held gadgets.
That’s all for this post!
Conclusion
A perfect combination of WordPress, WooCommerce and a WooCommerce compatible theme can allow you to generate an excellent e-commerce website without any kind of hassle. I hope the details mentioned in the above post would allow you to build one for your online business.
Our eCommerce personalization solution helps you to increase your online store’s conversion and sales by means of product recommendations, email retargeting and behavioral targeting. Free up to 50,000 unique users/month.
Â