Is it time to move your WordPress website to a new host?
With the importance of website speed on visibility in the search engines, you may decide that it is time to move your WordPress website to a new hosting provider. If you have been blogging for a while and have many posts with images, moving the site manually is painful.
There are WordPress plugins that will help with database back up and restore, but when you are moving to another host, the process outlined here may be easier for you. It not only helps you move your site quickly and easily, it also minimizes downtime.
For most of us, understanding the inner workings of the mySQL database is not something we want to deal with and may even seem scary. However, exporting the WordPress tables individually and importing them into a newly installed WordPress database, make it easy to move all the content of your website.
Part 1 – Creating a backup of your current site
If you are managing and maintaining your WordPress website yourself, you should have the following:
- An FTP client – Used to move files between your local hard drive and the hosted server. Good choices are Filezilla, a popular free FTP client that runs on both Windows and Mac and Ipswitch WS-FTP, a solid FTP client for Windows.
- Access to phpMyAdmin – Provides access to your MySQL database via your web browser. Many host control panels, such as cPanel and Plesk, have phpMyAdmin pre-installed.
- File compression software – Create, manage and extract zipped files and folders. WordPress makes it easy to install your theme and plugins through the dashboard if they are compressed into .zip format. Popular tools include WinZip, WinRAR and StuffIt.
1. Backup the entire wp-content area using FTP
This folder includes the uploads, themes, plugins and other folders created by plugins such as NextGen gallery.
2. Export your database tables using phpMyAdmin
Go to phpMyAdmin on your existing host and export the following tables as SQL – select the table then choose export so the name stays consistent with the table name.
- wp_posts
- wp_postmeta
- wp_comments
- wp_commentmeta
- wp_terms
- wp_term_relationships
- wp_term_taxonomy
- wp_usermeta
- wp_users – If you are the only user, no need to export. If you have multiple users, this will allow you to move all users with their passwords intact.
- wp_links – If you don’t have a blogroll, no need to export
- wp-options – export this for a backup of all of your current WordPress options however, you won’t be importing this table.
Some plugins create tables in the database, names of which will be obvious, and you should export each of these as well. For example:
- NextGen Gallery – wp_ngg_album, wp_ngg_gallery, wp_ngg_pictures
- LTW Testimonials – wp_ltw_testimonials, wp_ltw_testimonial_groups
- Redirection – wp_redirection_items
3. Export settings for your theme if applicable
If using a premium themes such as Canvas by Woothemes, export the theme settings into a .json file for faster setup on the new host.
4. Export settings for plugins that offer it
Some plugins provide an export feature for all its settings. For example, two of the plugins I use that do include:
- Fast, Secure Contact Form
- Post Snippets
5. Create a .zip file of your theme
You can install it via the WordPress dashboard or the cPanel File Manager.
6. Backup external file folders
If you have created any folders outside of the wp-content area that contain important files, back up those to your local hard drive as well.
We are now ready to move your site to a new hosting account.
Part 2 – Setting up your WordPress site on the new host
Now that you have all the pieces, it’s time to set up your site on the new host.
1. Install WordPress
Once you have set up your new hosting account, go to your control panel and install WordPress. On Bluehost using SimpleScripts, you have the option to install WordPress on a temporary URL, allowing you to get everything moved and tested before you change your name servers.
Note: if no temporary URL is provided, do all the steps pertaining to cPanel, update the name servers and then log into WordPress and activate everything.
2. Upload and activate your theme
Go to Appearance Themes Upload and upload your theme .zip file. WordPress will extract the files and install the theme.
3. Install and activate your plugins
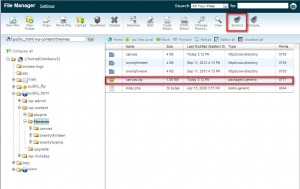
You can do this through the WordPress dashboard one at a time or you can create a .zip file of your plugins directory and upload that to the plugins folder using the cPanel File Manager. This file might be rather large, so you may be better off doing a fresh install from the dashboard. Then extract the files using the extract feature as noted in the screenshot below:

cPanel File Manager – Upload the .zip file and extract
4. Upload your media library
The WordPress media library is in the uploads folder in the wp-content folder. Create a .zip file of the uploads area and transfer via the cPanel File Manager and extract.
5. Import the SQL tables into the WordPress database
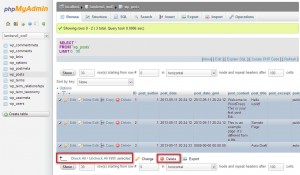
Through cPanel, open phpMyAdmin. Select the WordPress database and import each table to the new database. In order to import the data, the new table must be empty. When WordPress installs, there are posts, pages, categories and comments already created. Delete the data in the table before importing the data.

Delete data before importing content
Do not import wp-options! Set those up manually through the dashboard.
6. Import your theme and plugin settings if applicable, set up your widgets and test
Note: if you are using hosted email, set up your email accounts on your new site before switching the name servers to avoid losing any incoming emails.
7. Point your name servers to the new host
When you are ready to go live, set your names servers to point to your new host at the domain registrar. Although the registrars say that updates to all DNS servers throughout the world may take 48 hours, most update rather quickly.
8. Update WordPress General Settings
Change the URLs from the temporary URL to your domain name as shown below.

Change temporary URL to your domain name
Just log back in and you’re good to go!
There are benefits of moving your website using this process:
- The entire process takes about an hour to complete.
- The temporary URL allows you to set up the entire site and test it against the current site before making the final switch. That way if you do forget something, you can retrieve it from the old host.
- Backing up the individual tables simplifies backup and recovery of your website if something catastrophic happens. I find this method easier than using a plugin although you do need to remember to export the tables when you have updated your content.
Are you planning to move your WordPress website anytime soon? Let me know if this process works for you or if I left out any details.
This article originally appeared on Masterful Marketing and has been republished with permission.
Find out how to syndicate your content with Business 2 Community.
Article source: http://www.business2community.com/online-marketing/easily-move-wordpress-website-new-host-0632333
