
By now, you’ve almost certainly heard how good Google Photos is. Your friends, family, and coworkers are probably using it and singing the app’s praises. It makes backing up your photo library effortless. It can identify people — even babies — in your images with freakish accuracy. It automatically creates GIFs and movies that the people in your life will cherish. Hooray.
But there’s really no great manual or user guide for Google Photos. Google’s FAQ site is about as close as the company comes to a “getting started” handbook. So I’ve compiled some how-tos and tips here and plan to update this article to keep up with any big changes that Google makes to the app.
MOVING TO GOOGLE PHOTOS
Few tasks feel as daunting as transferring your entire photo library from one service to another. And few things feel worse than accidentally losing images or videos that you can’t replace. So as great as Google Photos might be, switching to it won’t be a small undertaking for everyone.
Apple Photos: If all of your pictures and videos are on your phone or Mac, this should be relatively straightforward. Just install Google Photos app on your iPhone or the desktop app for your Mac. On iOS, Photos will automatically start backing up your photo library. On Mac, you’ll need to point it to the folder where your photos are stored.
There’s just one potential snag to be aware of if you’re using Apple’s iCloud Photo Library. Depending on your settings, some of your images could be in the cloud and visible on your devices — but not actually stored on them. This might be the case if you got tired of warnings about low storage on your phone and decided to buy more space with iCloud. If you’re using iCloud Photo Library, Google Photos might be unable to see or upload your photos and videos. The easiest solution is to make sure every file is actually saved on your smartphone or computer. To do that, just enable the options below:
- iOS: Settings [your name at the top of the screen] iCloud PhotosSelect “Download and Keep Originals”
- Mac: Open Photos app. Choose Photos PreferencesSelect “Download Originals to this Mac”
- Windows: Apple explains how to download iCloud photos to your PC here.
Flickr: Glenn Fleishmann put together a thorough step-by-step guide at Macworld for relocating from Flickr to Google Photos. I wish I could say it’s a quick, easy process, but that’s not the case. It takes some work to bring everything over — especially if you want to save things like image titles, descriptions, and other details that some photographers will insist on preserving.
Glenn goes the manual route using Flickr’s own export process, which is sure to test your patience since it involves downloading multiple, large zip archives of your entire Flickr library to a PC or Mac. You might be able to find third-party apps that can assist with that arduous step. Pictogo is one I’ve had some success with on macOS. Once you’ve got all the files, using the Google Photos desktop app to send them to their new home in the cloud is the easy part. Thankfully, Google Photos makes it painless to edit critical data for photos (ie. when they were taken) in case some of that gets lost during the move.
My best advice is this: tough it out. Don’t let the distressing procedure make you abandon the entire mission. You’ll only have to do this once. Endure the grunt work and be done with it.
Windows / Mac: If you’re got a traditional photo library (folders upon folders), the Google Photos desktop uploader should get the job done fairly well.
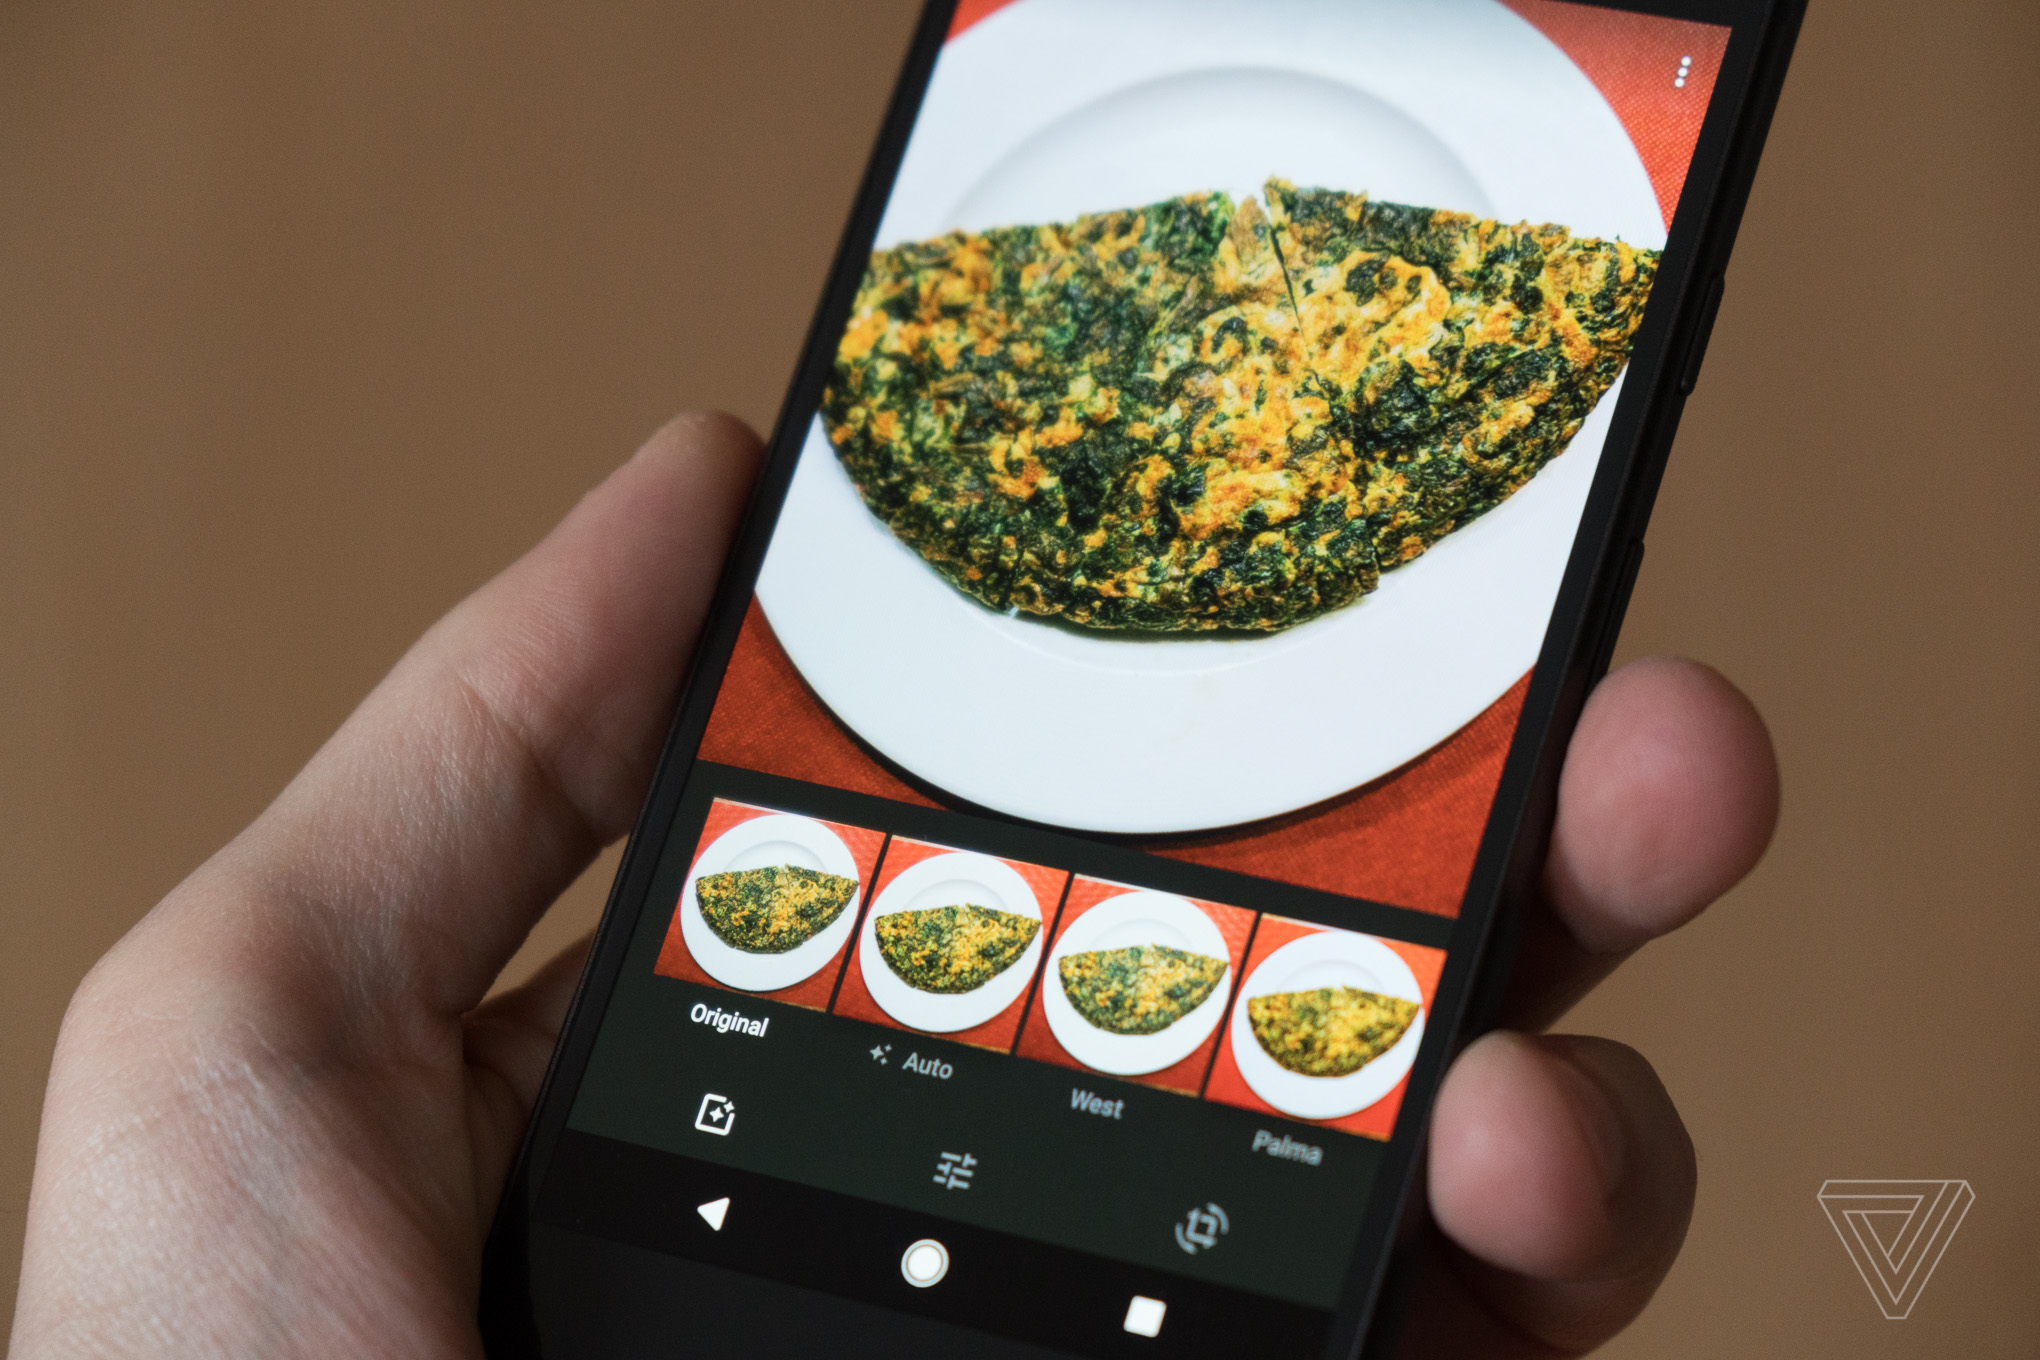
Photo by Vlad Savov / The Verge
CHOOSE WHAT TO BACK UP, WHEN, AND AT WHAT QUALITY
Google Photos automatically backs up the pictures and videos you capture with your smartphone. When you first set up the app, you’ll be given two choices on backup quality: optimized or original. Optimized is an enticing choice since it offers unlimited storage for free. And it’s a fine option if you plan on sharing your images mostly online — via email, on social media, etc.
But if you’re a semi-serious photographer, potentially see yourself making a photo book, or just want to archive everything without any quality degradation, it’s best to pick “original.” However, original backups will eat into your Google account storage, so you’ll likely need to upgrade at some point to get more room in the cloud for your library. By default, Google accounts come with 15GB of storage.

Google Photos gives you plenty of flexibility about when backups occur. You can tell the app to only back up over Wi-Fi if you need to be careful about using too much data on your phone. Google Photos can also be set to only do backups while your phone is being charged to minimize any battery drainage. Personally, I’ve configured Photos to back up pictures at any time with cellular data but to wait for Wi-Fi for video uploads.
Sometimes you might need Google Photos to back up more than just camera roll items, though. You can choose which folders — screenshots, downloads, Instagram, etc. — Photos backs up by going to settings, then “Back up sync,” and then select “Back up device folders” to toggle folders on and off.
If you want to back up an individual photo or video that’s in a folder not being synced with Google Photos, you can just do it manually. Open the image, tap the three-dot menu button in the top right, and choose “Back up now.” You can select multiple items when doing manual backups, as well.
THE HELPFUL, AUTOMATIC ASSISTANT
One of the best aspects of Google Photos is how much work it does for you automatically — without you doing a thing. Did you take a weekend trip somewhere? Photos will recognize that those pictures were taken in a specific location and create an album grouping them all together. If you took a sequence of similar images (even if they’re not technically “burst” shots), Photos will often make an animated GIF out of them. It’ll also create movies (with a music track), collages, and filtered versions of your shots. Again, this all happens with no work on your part.
These automatic creations show up in the Assistant tab, where you’re free to either save them to your library permanently or swipe them away if Google made something bad. And yes, sometimes there are misfires. Movies are often imperfect when an algorithm is doing the editing, and Google really tends to layer on the effects thick when it randomly applies a filter to one of your photos. And just like with Facebook, on some days you’ll open Photos and be greeted with photos of an ex or other delicate memories thanks to the “Rediscover this day” feature.
But more often than not, the Assistant produces really great stuff that’ll cause you a quick burst of emotion. And whether they’re rooted in joy, nostalgia, or wistfulness, those surprises get very addicting.
How to hide someone in Google Photos:
- Tap the search bar
- Expand the section with faces of people in your library
- Tap and hold on the person you don’t want to see
- Select “Hide” in the upper right corner
Once that’s done, Google Photos will avoid surfacing photos featuring that person in “Rediscover this day.”
SEARCH IS THE KILLER FEATURE
If you want to sell someone on Google Photos, show them the app’s search powers. You can do the basics like “selfie” or “photos from last weekend.” But the wow factor really hits when you search for specific subjects that Google Photos has identified in each of your shots. From individual people in your life to animals, objects, events (“concerts”) and nearby landmarks, Photos can pull up whatever you’re looking for in a massive library with astonishing speed. Occasionally some odd and not-quite-right results will appear with the good ones, but search is usually far more accurate than not.

You can also ask search to show specific types of content within your library like GIFs, 360-degree photos, screenshots, and videos.
MAKE YOUR OWN GIFS
You’re not just limited to the GIFs that Google Photos automatically makes. The app also lets you create them with any photos you’d like. Select the sequence of images you want, tap the + icon, choose animation, and you’re done. You can string together any photos in your library that you’d like, which allows for a little more creativity than a GIF of burst-shot photos.
OR MAKE MOVIES FOR YOUR PARENTS
GIFs might be popular among your friends, but your parents and other family members might appreciate the movies feature of Google Photos a little more. They like that stuff. To have the app automatically create a movie, select any images and videos you want to include, tap the plus button, and pick movie. Movies can only be created with the Google Photos mobile app; you can’t yet make them from the web.
From there, you can either just go with whatever Google makes or take control and edit things yourself. To change up the style and transitions, tap the clapperboard icon at the lower left of your screen. To switch up the music track, tap the music note. And if you want to adjust the order of content in the movie — or add or drop images — choose the film strip. Once you’re done, you can either share your movie directly or upload it to YouTube for public viewing.
SHARED ALBUMS
If you want to share your shots from a wedding or a party with other people that attended, Google Photos makes this relatively simple. Select the album that you want to share, tap the share icon, and start entering their name or email address. You can also create a new “Shared Album” and choose whether or not people you share it with will be allowed to contribute to the album.

If someone you’re sharing with is already a Google Photos user, you’ll see the app’s icon on that person’s profile image. In this case, you can choose to share via Google Photos and they’ll receive an in-app notification. Otherwise, you can just simply share by email. Recipients must have a Google account to add their own images and videos to a shared album, but anyone with the link can view the album and download photos — even if they’re not in Google’s ecosystem. In that sense, it’s worth using a bit of care with the shared album link. There’s no way to assign different permissions to specific people you’re sharing with. You can block someone’s Google account to revoke access to any shared album. Next to the person’s name, tap “More” and then hit the block option.
FREE UP STORAGE ON YOUR PHONE
As Google uploads your phone’s camera roll to the cloud, you might want to erase the copies of those images on your device to free up space. Photos makes this fairly simple:
- Open the side menu
- Select “Free up space”
- Google Photos will know what content has already been backed up and is safe to clear off of your device. Just tap the “remove” button to take the final step.
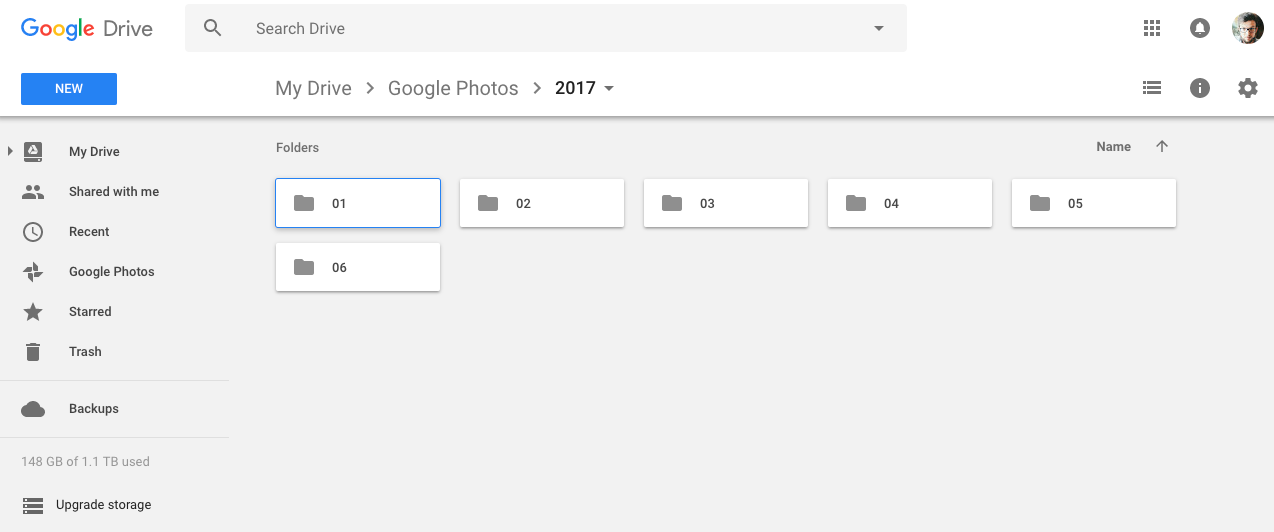
FOLDERS! TURN ON THE PHOTOS FOLDER IN GOOGLE DRIVE
If for whatever reason you want or need to dig through the actual folder and file structure of Google Photos, you can do this through Google Drive. Go to Drive, then settings, then check the “Create a Google Photos folder” option and you get… folders. Like this:
ARCHIVE THE UGLY STUFF
Google recently added an “archive” feature to Photos. This removes images from the main view of all your photos — but they’re still accessible in the Archive folder. Photos will suggest some stuff to archive (like screenshots) but you can use archive for more… sensitive content as well.
SATURATE YOUR SKIES
The built-in editing tools in Google Photos are perfectly adequate if you’re making basic touchups. And if nothing else, hitting the “Auto” filter usually does a very nice job of improving the white balance of your image.
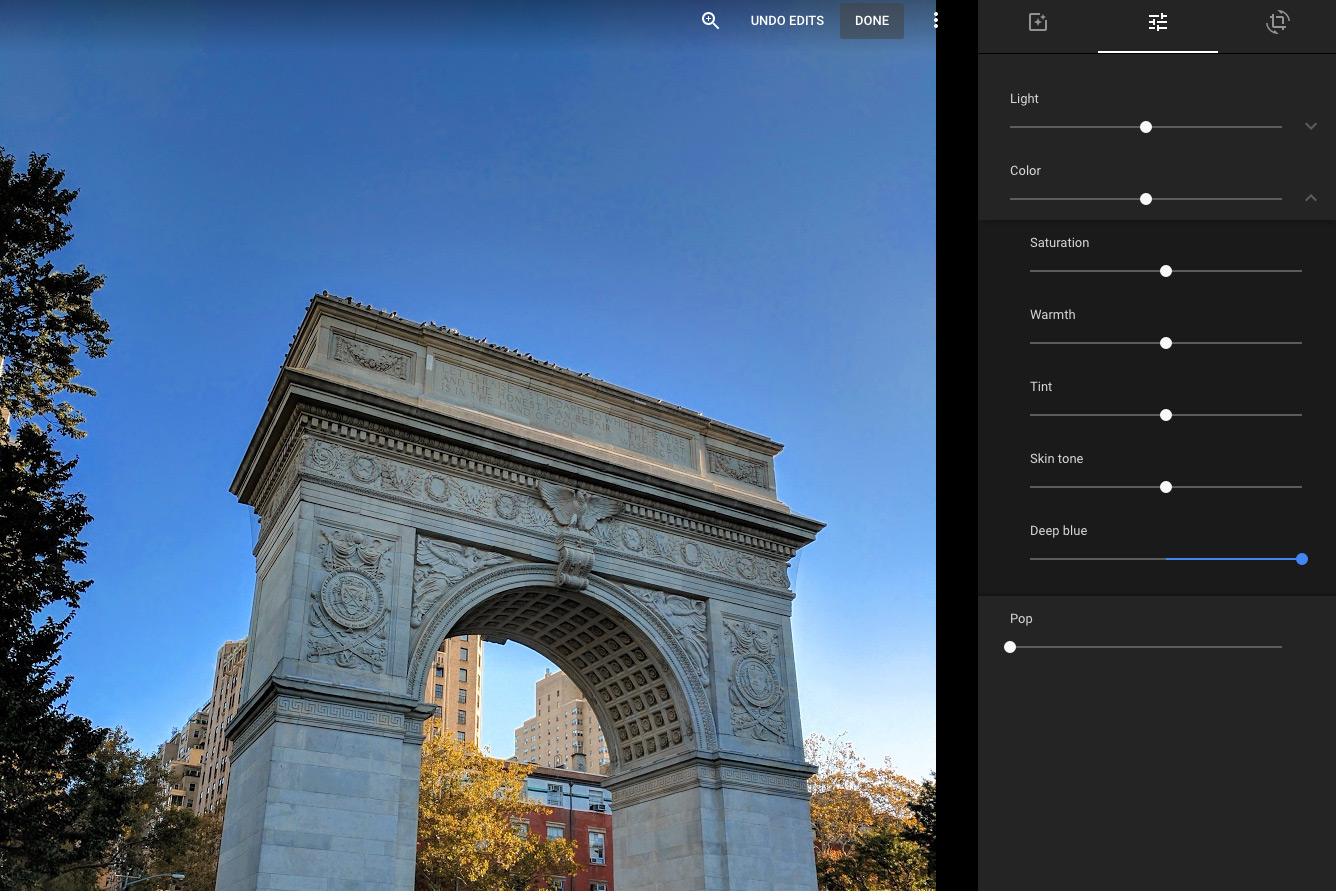
There’s also a way to pump up the blues in your sky photos — without ratcheting up the saturation of the entire scene. Tap the pencil / edit button, choose the middle icon of setting sliders, and then expand the “color” section. There, you’ll see a slider for “deep blue.” Move that up, and your sky photography will get a a lot more pop. You can also use it for other blue subjects, as well.
Other random tips and tricks:
- You can change the look and density of your library as it appears on your phone’s screen with a pinching gesture. Pinching in will increase the number of images shown on screen at once until you get to a month / year view, while pinching outward will zoom in to display just a few photos at a time — but much larger.
- For the mobile app: if you know when a photo you’re looking for was taken, it’s much faster to use the scrubber on the right side (that appears as you scroll) to navigate your library. Once you grab it and scroll either up or down, you’ll see the month and year pop up next to your finger so you know when to stop.
- You can tell Google Photos to automatically strip out the location data from images and videos that you share with a link. Go to settings and toggle on “Remove geo location.” Google notes that this doesn’t remove geolocation data for photos and videos that you share “by other means” in the app.
- Google Photos is the best cloud photo service going today, but if you’re not a fan of giving Google so much of your data, it’s relatively easy to bail on the whole thing. Just go to Google Takeout and you can choose to download your entire photo collection.

As I mentioned earlier, I plan to update this How-to over time as Google introduces or changes Photos features. If you’ve got any questions (or if there’s something you’re dying for Google to add), I’d love to hear about all of it in the comments.