WordPress is one of the
most widely used blogging platforms. However, it’s not limited to
blogging. In fact, WordPress has become so flexible that it’s a capable
foundation for many types of sites. Thanks to its powerful plugins, you can
bend and shape a WordPress installation to do just about anything. One thing
you may want your WordPress site to take on is invoicing.
Anyone running his or her own business (especially a
consulting business) knows that invoicing is crucial to success. Without an
efficient, reliable means to invoice clients, getting paid can quickly
become a problem. A handy WordPress plugin specifically created for the task of
invoicing is WP-Invoice.
Features
With WP-Invoice, you can:
- Create invoices from the WordPress control
panel; - Prefill customer information from the WordPress
user list; - Send invoice notifications with a secured link
to the web-invoice; - Accept credit card payment via Authorize.Net or MerchantPlus NaviGate;
- Use PayPal;
- Set up recurring billing (using Authorize.net’s Automated Recurring Billing);
- Force web-invoice pages to SSL mode;
- Archive old invoices;
- Use completed invoices as templates;
- Customize tax label, states input, and PayPal
button URL; - Create users directly from WP-Invoice;
- Customize billing settings on a per invoice
basis; - Customize invoice notification email on a per
invoice basis; and - Use templates for invoice notifications,
reminders, and receipt.
Installing WP-Invoice
There are a couple of ways to install this plugin, though I’ve decided to
approach this in the easiest possible way — through the WordPress dashboard.
Follow these steps:
- Log in to your WordPress Admin tool (usually
this is done by adding /wp-admin to the end of your WordPress URL). - Click the Plugins section.
- Near the top of this page, click Add New (Figure
A). - In the search field of the new page, enter wp-invoice and click Search Plugins.
- Click Install Now for the WP-Invoice entry (not
wpinvoice). - When prompted, click OK.
Figure A

WordPress makes it easy to install plugins. (Click the image to enlarge.)
After the plugin installs, you’ll be asked to activate the plugin, which you
should do. Then, you’ll be directed back to the plugins page of your WordPress
dashboard. You’re ready to start setting up your invoicing tool.
Setting up WP-Invoice
Warning about Apache mod_security
In some instances, Apache mod_security blocks the saving of settings for
WP-Invoice. To get around this, you’ll need to temporarily disable
mod_security, configure your WP-Invoice setup, and then re-enable mod_security.
The easiest way to temporarily disable mod_security is to create an .htaccess
file in the document root of the web server with the following contents:
SecFilterEngine Off
SecFilterScanPOST Off
Save that file and restart Apache. After you take care of the final setup of
WP-Invoice, make sure to delete or rename that .htaccess file and restart
Apache. If you don’t remove that file and restart the server, Apache will be
wide open and insecure. The developers of WP-Invoice are aware of this issue,
but they haven’t found a fix yet. Remember:
don’t forget to turn mod_security back on.
Setup instructions
Click the new Invoice entry in the left-hand navigation to reveal the
WP-Invoice first use setup options (Figure B).
Figure B
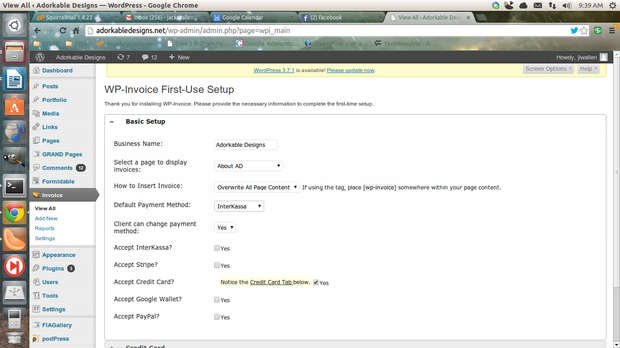
When you first use WP-invoice, you’ll be presented with this page. (Click the image to enlarge.)
Go through the options and set them to meet your needs. To set up your
payment method, select it from the Default Payment Method drop-down. If you
select PayPal (as I have), a new section will appear at the bottom of the page
(Figure C), which is where you’ll need to configure your payment
information.
Figure C
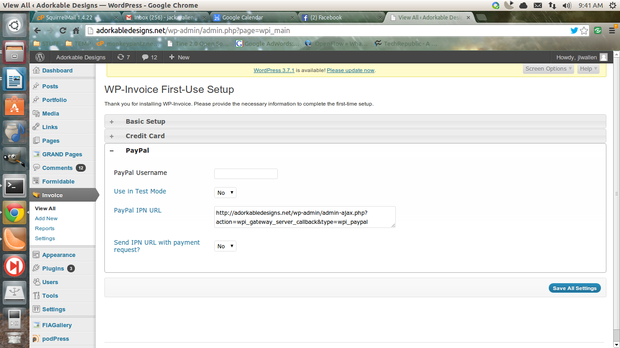
Setting up PayPal as your default means of payment. (Click the image to enlarge.)
After you set the default payment option, you’ll gain access to the rest of
the plugin settings. Go to the Main tab to add company information and to
enable the plugin to use custom templates. To do this, you must check the box
for Use Custom Templates and then click the Install button (Figure D).
Figure D
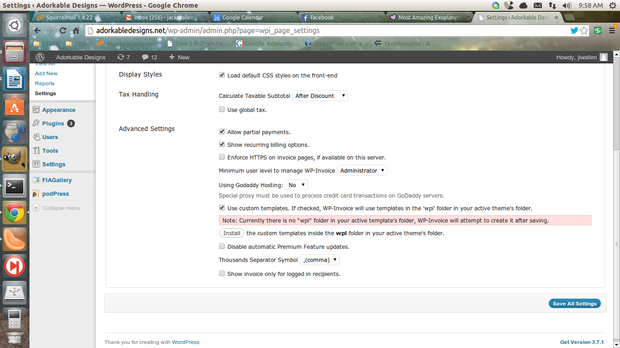
Enabling WP-Invoice to use custom templates. (Click the image to enlarge.)
When you click Install, you must click OK in the warning box — the warning
states it will overwrite any theme files you currently have in your wpi folder.
You’ll want to go through every tab in the plugin to make sure it is configured
to meet your needs.
But before you start using the system, you need to create line items to use
in the invoices. To do this, follow these steps:
- Click the Line Items tab.
- Click Add Line Item (Figure E).
- Enter the information for the line item.
- Add as many line items as necessary.
- Click Save.
Figure E
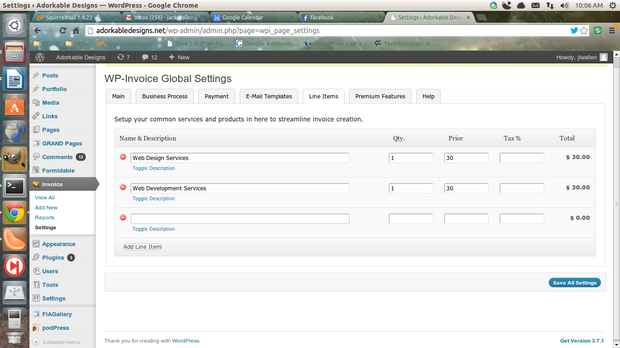
Add Line Item (Click the image to enlarge.)
After you go through all of the plugin’s settings, you’re ready to start
using the tool.
Using WP-Invoice
Go to Invoice | Add New and then enter the necessary information. After you
save the invoice, go to View All and then you can send the invoice by opening
it and clicking Send Notification (Figure F).
Figure F
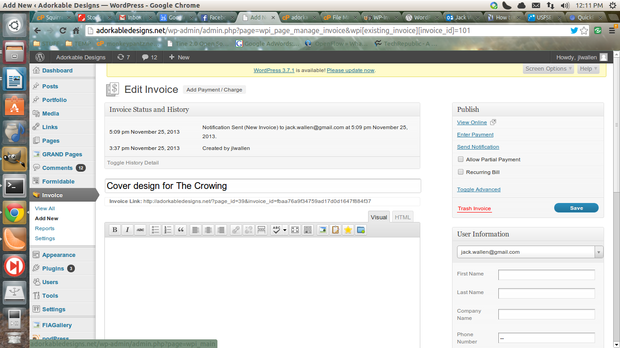
Sending invoices and notifications is simple. (Click the image to enlarge.)
After you send an invoice, if you don’t hear back from the client in an
appropriate time, you can send an invoice reminder from this same location — just
select a different template.
From that point on, the system is incredibly user-friendly and ready to help
you keep your invoicing as reliable and ready to serve as possible.
More about WordPress on TechRepublic
- The top WordPress tools for developers, designers, and consultants
- Five useful WordPress Add-Ins
- How to install the WordTwit plugin to automate tweets from WordPress
- Install the bbPress forum plugin for WordPress
- How to set up your first bbPress forum
- How to insert spreadsheets in a WordPress blog, part 1
- How to insert spreadsheets in a WordPress blog, part 2
Article source: http://www.techrepublic.com/blog/smb-technologist/install-the-wp-invoice-plugin-to-send-invoices-from-your-wordpress-site/
